Wednesday, August 21, 2013

The most delicious buttercream


When it comes to cupcakes, frosting can make or break. There are three frostings that I use for the cakes and cupcakes I create for Spongedrop – Classic Buttercream, Cream Cheese Frosting and Meringue Buttercream. Each with their own unique flavour and texture.

Classic Buttercream is traditionally used on American style cupcakes. It’s sweet, buttery and provides a classic cupcake ‘experience’ – the perfect combination of light sponge and sweet creamy frosting.

Cream Cheese Frosting is Carrot Cake’s accomplice, the two go hand-in-hand and it’s a Kiwi favourite but it also pairs well with other cakes too. It’s creamy and sweet with a mellow tang.

Meringue Buttercream is the most luxurious and one of my all time favourites. Light, velvety smooth and not too sweet, it’s easily flavoured with fruit, chocolate or essence. I love it. Here’s my recipe for this beautiful frosting. It does take more effort but it’s well worth it.


Meringue Buttercream
170g egg whites
375g caster sugar
500g unsalted butter, room temp
Flavouring (vanilla, melted chocolate, lemon juice etc)

Whisk egg whites and caster sugar in a large metal bowl to combine. Place over a pot filled with a small amount of boiling water (creating a double-boiler) and gently heat until the sugar is melted. Whisk often to make sure the egg whites don’t start to cook. It’s an odd theory to heat egg whites without cooking them but it works, trust me. Make sure all sugar granules are melted by rubbing some of the mix between your fingers. Once ready, beat on high speed until the meringue has cooled close to room temperature – it will take at least 10mins. Add the butter a little at a time and keep beating, continuing until all the butter is incorporated. If it’s runny it means your meringue was a little warm when you added the butter – persist with beating and it will soon turn into a beautiful, creamy bowl of the most delicious frosting ever. Add flavouring of your choice.

Weekly Tip: Try using leftover egg yolks to make French Buttercream, this is similar to Meringue Buttercream but has a creamier, richer finish. 

Tuesday, July 23, 2013

Flavours Column: Apple Cider Donuts

These little babies were photographed during the apple orchard shoot that Greta (Greta Kenyon Photography) and Shaye (On My Hand) organised a few months back and I've been working at perfecting the recipe since - that's a lot of donut testing. We spent the afternoon at Ataahua styling and taking photos of apple punch, honey, caramel, donuts and a delicious apple and oat stack that's about due to be featured in the upcoming Magnolia Rouge. Yay! Watch this space for that recipe but in the meantime, make these!

Styling: On My Hand
Photo: Greta Kenyon Photography

Baked Apple Cider Donuts
Published in the Bay of Plenty Times, Weds 24th July 2013

Donuts and apple cider, a genius American combination. These light, doughy, baked donuts are gently spiced and have a good hint of apple tang. They take just 8 minutes to bake and are a great alternative to traditional cakes and cupcakes, with less sugar. I purchased donut pans from Culinary Council in Gate Pa (my go-to place for anything kitchen related) and they produced perfect round donuts. If you don’t want to be the proud owner of donut pans like I am, use a muffin pan instead although I don’t think the end result will have quite the same donut charm. These are great as is and even better warmed with a scoop of vanilla ice cream! 

Thanks to On My Hand - Props, Styling & Flora for the styling (without Shaye most of my photos would look incredibly average) and to Greta Kenyon Photography for capturing my sweet treats so beautifully.

1 ½ cups Apple Cider (I used Cider House Scrumpy)
75g wholemeal flour
75g cake flour*
½ teaspoon baking powder
¾ teaspoon baking soda
Pinch of salt
1 teaspoon cinnamon
¼ teaspoon nutmeg
¼ teaspoon allspice
1 egg
70ml canola or coconut oil
1 teaspoon vanilla
50g white sugar
25g brown sugar

Boil the apple cider in a pot over high heat until it reduces down to half a cup (around 10mins) then leave to cool. Preheat oven to 200°C and grease your donut pan. Whisk all the dry ingredients together in a bowl. Whisk the egg, oil, vanilla and sugars together – add the reduced cider once it’s cool. Pour wet ingredients over the dry and mix until just combined. Spoon the mixture into a piping bag and pipe into the donut pan (if you don’t have a piping bag use a zip-lock bag and snip the corner), filling the donut holes about 2/3 full. This recipe yields around 8 donuts. Bake for 6-8mins, until they spring back when touched. While the donuts are still hot toss them in a bowl of cinnamon sugar (made by mixing white sugar with cinnamon).

*Weekly Tip: Cake flour gives a lighter, softer texture. Make your own cake flour for this recipe by sifting 60g plain flour with 15g cornflour.  

Tuesday, July 2, 2013

Flavours Column: Peanut Butter Pie!

Aaaagh. This pie is really really good. I didn't think peanut butter as a dessert flavour was going to be my thing. Turns out it is. I'm pretty sure this pie would be almost everyone's thing at dessert. Except if you're allergic to peanuts, then I'd recommend you avoid it. Bummer.

Photo: Swift & Click

Peanut Butter Pie
(Published in the Bay of Plenty Times, Weds 3rd July 2013)

It’s Independence Day tomorrow and as I have family in America, including an adorable niece and nephew who are growing up with cute American accents, I thought we’d make July ‘American inspired’ dessert month! I’m all for embracing new food cultures and even though we have plenty of American themed burger joints to indulge ourselves in, there is much more to American cuisine than the golden arches. The desserts over the next weeks only touch on this so I encourage you to do your own foodie research.

Our first American dessert is this indulgent Peanut Butter Pie. It tastes like a Snickers bar - rich, creamy, gooey, peanutty. Most Peanut Butter Pie recipes online use ‘Cool Whip’ (whipped frosting) as an ingredient but I’m happy to say that this one doesn’t. Eating Cool Whip is a little like eating plastic. Eating this pie, thankfully, is not. 

Thanks to Rach from Swift & Click for the photos!

Photo: Swift & Click

Peanut Butter Pie
(Adapted from Parsley, Sage & Sweet)

2 packs Oreo Cookies
6 TBSP melted butter
125g milk chocolate
1/3 cup chopped peanuts
220ml cream
250g Philadelphia cream cheese
1 cup creamy peanut butter
120g icing sugar
1 x 380g can caramel condensed milk
Squeeze of lemon juice

Throw the Oreos into a food processor and whiz to crush. Pour in the melted butter and whizz again. Press into the bottom and sides of a 23cm cake tin to form the crust. Melt the chocolate and spread over the base, sprinkle with nuts and chill in the fridge. Whip the cream and keep chilled. Beat the cream cheese and peanut butter until combined. Beat in the icing sugar then the caramel condensed milk and lemon juice, beat until smooth. Mix in a third of the whipped cream then fold in the rest. Pour into the base and chill for at least 2hrs or overnight. To make serving easier, freeze the pie for 30mins before slicing. Top with extra whipped cream, nuts and drizzled chocolate.

Weekly Tip: Make your own caramel by boiling an unopened can of regular condensed milk in a pot of water for 2.5 hours. Make sure the can is always covered by water (otherwise it might explode - hot caramel all over the kitchen = not a good thing!) and cool before opening.   

Tuesday, June 18, 2013

Flavours Column: Fudge that's good for you

I know that's a big statement but I'm pretty sure I'm right. Right? As mentioned in my column (see below) I've done a little research into the ingredients in this recipe to save you the hard work. It was entirely internet based research so don't take it for gospel! But I did try to be thorough. I like to know why I'm adding ingredients to things, if not just for flavour or because they are a recipe necessity.

Finding ways to make more traditional recipes healthier is having a massive surge in popularity at the moment so this fudge is my nod to that. I am a baker however and have a business based on cake so can't be too harsh a critic against sugar, flour, butter and all these things that have been part of our lives (as most of us know it) for, basically, ever. I am all about moderation and try to eat a healthy diet outside of the cake universe I dwell in the majority of the time. And I am completely open to trying new ingredients and making entirely healthy fudge. Especially one that tastes this good.

Okay, so here's the breakdown of the ingredients and my personal view on them.

Walnuts & Almonds
I think we all know these are good for us. They are full of nutrients, protein and essential fatty acids. Eating walnuts apparently improves the sperm quality of healthy young men. I didn't know that until now. I'm guessing you probably didn't either. They are good for your heart, your brain, your skin. That's my understanding. I believe nuts are good.

Raw Cacao Powder
My research into this hasn't convinced me that I need to spend $15 on a small bag of 'raw cacao'. The way I see it, 'raw cacao' comes from the exact same 'cacao' bean that cocoa comes from. The cacao bean being the basis of chocolate. It seems that it may be down to how the cocoa/'cacao' is treated/processed that matters, yet no one website can really firm that up for me. Possibly they are one and the same and the 'raw cacao' is a marketing ploy. I'm just saying 'possibly'. If you don't want to use raw cacao just use regular cocoa.

Medjool Dates
I like these based on their name alone. Dates are the oldest cultivated fruit and medjool dates can usually be found in the fresh fruit section of your supermarket. They are bigger and softer than standard dates you find on the shelf. Dates contain essential nutrients, are high in potassium and have a low-mid GI meaning they release energy slowly as opposed to giving you a sugar 'rush'. They are needed in this recipe to add sweetness and to bind the ingredients. 

Oats
If you are gluten free or coeliac it's best to leave these out as they may not be 100% gluten free. Oats are a whole grain said to reduce the risk of heart disease and improve immune defences. They digest slowly keeping you fuller for longer and, similar to Medjool dates, won't give you a spike in blood sugar levels. Oats are good and just writing this made me want some.

Coconut & Coconut Oil
Another health food ingredient that is everywhere at the moment is coconut oil. For many years experts said it was bad for us, now they have changed their minds. Apparently it can do EVERYTHING. I'm not joking, the number of things listed online that this oil can do is ridiculous! From giving you glowing skin and shiny hair, making you lose abdominal fat, lowering bad cholesterol and increasing good, aiding digestion, boosting your immune system and cleaning your entire house. I've used it as a dairy substitute in baking with good results. I'm leaning towards liking this product, with just a dash of skepticism. 

Chia Seeds
These little black or white seeds don't taste like much so are easily added to almost anything. Sprinkle them on a salad, put them in bread, add to your cereal etc. They swell up when they come in contact with liquid and turn into a gel. It's cool. You can make them into a pudding, like sago. They date back to Mayan and Aztec cultures. 'Chia' means 'strength' and they are eaten for their energy boosting qualities. For such a little seed it sounds like they have a lot to give including omega-3 fatty acids, carbohydrates, protein, fibre, antioxidants and calcium. I like them.

Cinnamon
Cinnamon is said to increase your metabolism. Even if only for a short time I am all for this. It's also said to help control your blood sugar levels. I'm a big fan.

Pure Maple Syrup
Please don't buy the 'maple-flavoured' syrup. Just don't. Have honey instead if you don't want to pay for pure maple syrup. Thank you. Real maple syrup actually comes from the sap of the maple tree, so it's less refined than white sugar and contains more nutrients. It is however, still a sugar (containing sucrose, glucose and fructose), albeit with a slightly lower GI, and is high in calories. It is sweeter than sugar therefore you can get away with using less. 

Just a reminder, these are my opinions only and are based on very top-line research. I like to maintain a healthy level of skepticism towards most things. If you have an opinion on any of the above feel free to share it in the comments below but please be nice :) Otherwise, make this fudge and enjoy it!!


Fudge that's good for you
Published in the Bay of Plenty Times, Weds 19th June 2013

Currently in my cupboard is an excess of fresh walnuts that my mum and nana very kindly foraged for me a few weeks ago. I’ve been shelling them, which has led to a newfound appreciation for the work that goes into the bags of nuts we buy at the supermarket! Don’t get me wrong; I’m not under the impression these nuts are shelled by hand, but still!

This week’s recipe is for Health Spa Fudge. Not the greatest name, but it is great for you. It’s FULL of energy, healthy fats, vitamins, minerals and antioxidants. But most importantly it tastes AMAZING. It’s intensely cocoa-ey, has a soft, slightly crunchy texture and will satisfy any chocoholic.

I used organic ingredients but please don’t fret about this if it’s out of your budget, you can substitute standard products and still enjoy many of the health benefits. Also, if you don’t have things like chia seeds simply leave them out and you can swap raw cacao powder for standard cocoa (which is already high in antioxidants). This fudge is vegan, dairy free and, if you omit the oats, gluten free. Don’t let this put you off! Try this fudge, you won’t be disappointed.

Health Spa Fudge
1 cup walnuts
1 cup whole almonds
½ cup raw cacao powder
10 medjool dates, pitted
½ cup oats
1 cup desiccated coconut
1 TBSP chia seeds
¼ teaspoon cinnamon
3 TBSP coconut oil
1 TBSP real maple syrup

Ganache
½ cup real maple syrup
¼ cup coconut oil, softened
½ cup raw cacao powder

Place walnuts, almonds, cacao powder, pitted dates and oats (if using) into a food processor. Whizz up until finely ground. Add the coconut, chia seeds, cinnamon, coconut oil and maple syrup and whizz again until you have a fudgy consistency. Add a splash of water, or more maple syrup, if it’s too dry. Once you have a firm, fudgy consistency, line a baking tin and press the fudge into the tin. To make the ganache, whiz the maple syrup, coconut oil and cacao powder together. Smear onto the fudge and chill in the fridge for an hour to set.

Weekly Tip: Not all maple syrup is created equal. Buy the best you can but please don’t use ‘maple flavoured’ syrup. It’s not maple syrup.


Saturday, June 15, 2013

Flavours Column: Raspberry Meringues

Today a suitably witty, articulate and clever (as my writing so often is) introduction to this post is eluding me. I'm sorry. Instead we'll stick with the classic...  'insert your name' meet Raspberry Meringues. Raspberry Meringues meet 'insert your name'. I hope you like each other. x

P.S. I was being facetious about my writing. Just in case you couldn't tell.


Raspberry Meringues
(Published in the Bay of Plenty Times, Weds 12 June 2013)

I posted a sneak peak photograph of this recipe on my Instagram account last week and got a lot of requests for the recipe! Meringues make a great dessert and always impress. 

I love the rough, whippy shape of these meringues that are simply dolloped onto the tray to bake. If you prefer a more refined meringue feel free to pipe them using a round or star shaped nozzle. 

The raspberry flavour comes from using freeze dried fruit powder. I used Nutrafresh™ Sparkling Raspberry Powder. These powders add a true, intense fruit flavour to desserts (which is only natural given they contain 100% fruit). You can pick them up in gourmet food stores such as Nosh, which stock the Fresh As brand, and Simplifood on Maunganui Rd. 

If you’ve never made meringues before don’t be afraid! This recipe hasn’t failed me yet. The result is light, crisp, puffy meringues. Perfect served with berries and cream. 

Ingredients
180g egg whites (roughly 5 eggs) 
400g caster sugar 
15g Nutrafresh™ Sparkling Raspberry Powder 
Frozen raspberries to paint & serve 

Preheat oven to 100°C. This is a Swiss meringue, meaning the egg whites and caster sugar are warmed over a bain-marie. Swiss meringue is my favourite type (there are also French and Italian types) as it’s very reliable. Bring a small amount of water to a simmer in a pot. Place a bowl containing the sugar and egg whites over the pot of simmering water and whisk gently until the sugar is completely melted. Remove from the heat and beat until you have a glossy white, fluffy meringue. Add the fruit powder and beat to combine. Pipe or dollop blobs onto trays lined with baking paper. Bake for 1 hour then turn the oven off leaving the meringues inside to continue drying for at least two hours (even better, overnight). To create the raspberry swirl look, puree raspberries and paint onto the dried meringues. Pop painted meringues back into the oven for 10mins to dry. 

Weekly Tip: Experiment with the fruit powders. They can be used in almost any recipe where you want to enhance the fruit flavour. There's even a beetroot powder which I've earmarked for macarons!

Grateful for good friends. Kinfolk Workshop

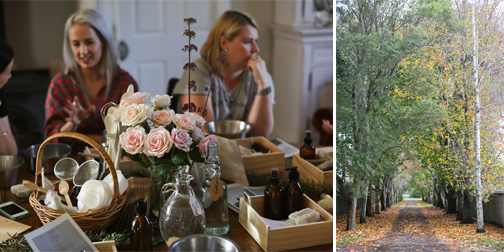
Good friends have given me some great opportunities in life and created many great moments. This was one to add to that list. On Sunday 26th May, the first New Zealand Kinfolk workshop was held at Willowdene Boutique Bed and Breakfast, hosted by On My Hand and Greta Kenyon Photography.

Kinfolk is a quarterly magazine and online community, born in Portland Oregon, that delivers entertainment ideas for simple ways to spend time together. Described as "a resource of enticing and meaningful activities" it's a collaboration of personal ideas that are focussed on creating a balanced, intentional lifestyle. It's about living simply and enriching life with an awareness of our environment and surrounds. Things that are often taken for granted!

Every month 'Kinfolk Community Gatherings' are held around the world by hosts selected for their shared ethos. Whether it be gardening, cooking, beekeeping or butchering, Kinfolk workshops are a way to get back to the basics, engage in a new skill and gain a refreshed perspective and appreciation of our little piece of the world.


The 'Freshen Up' workshop, held by Greta and Shaye, was a guide to creating homemade, chemical-free cleaning products out of everyday pantry items and a few little easy-to-source extras. Attended by a group of very enthusiastic women we spent the afternoon learning how to make beautiful, natural hand soaps and room mists. Shaye demonstrated her passion for making use of nature's own resources as she brewed soap nuts over the stove and blended essential oils while Greta captured the beauty of the event as seen in these photos.


My little input to the day was to ensure the girls were well fed. Alongside a selection from Informal Organic Tea (thanks Tim!) guests were treated to delicate rosewater sponge cakes, lavender biscuits and beetroot, goats cheese and walnut tarts.

Walking away with newfound knowledge and skills, new friends and not to mention our own bespoke bottles of hand soap and room mist, gifts from ecostore and the Waiheke Soap Company, I know we all left as very happy, enriched girls!


If you're interested in attending a Kinfolk workshop please keep an eye on the pages of Shaye and Greta as there are already upcoming events in the pipeline.

Greta, Shaye and Emily from Wild & Grace have all documented their own experience of the day on their sites if you'd like to read more. Links are here, here and here.

Thanks Shaye & Greta for asking me to be a part of this event. Your support and friendship since starting my business has been incredible. x


Tuesday, June 4, 2013

Flavours Column: Pineapple Flowers

Someone once told me I make 'the most edible looking cakes'. It was one of the best compliments they could give. That's what I set out to do. I don't want to make cakes that look gimmicky or fake. I want people to want to eat them. 

Usually I try to avoid overly gimmicky decorations. Or at least what I consider gimmicky. Unless they compliment the flavour or make the cakes look more appealing, I'd rather not have them. I wasn't altogether convinced about these pineapple flowers when I first saw pictures of them but in actuality they are pretty impressive! Who wouldn't want to eat one of these?!


Pineapple Flowers
Published in the Bay of Plenty Times, Wednesday 5th June 2013

So far my columns’ have been very baking-centric, which is only natural as this is the heart of my business and my passion. Second to the art of great baking however is beautiful presentation. When it comes to cake it truly should be a whole package - cakes that both look and taste incredible! As they say, we eat with our eyes first.

This week I thought I’d share with you a fun new decorating trick I’ve discovered, pineapple flowers. I wasn’t sure about these to start with but have to admit they look great and taste good too.

They are easy to make – all you need is a fresh pineapple, a sharp knife and an oven. I used them to top pineapple cupcakes but they could work for so many things. Like cocktails.

You’ll need:
1 fresh pineapple
A sharp knife
Oven tray
Baking paper
12-cup muffin tin

Top and tail the pineapple and slice off all the skin and brown spiky bits. Lay the naked pineapple on its side and carefully cut thin rounds to create perfect circles of pineapple. The thinner you can cut the slices the better. Some of mine were around 3mm thick but still worked fine. Place the slices on lined baking trays, approx 6 per tray, and bake at 120°C. After 30mins flip the slices and bake for a further 30mins. Keep an eye on them. If they start to brown turn the temperature down. You’re aiming to dry them out as opposed to cook them to a crisp! After an hour place the slices into a 12-cup muffin tray to create the flower shape, pop back into the oven and turn off the heat. The remaining heat will continue drying the pineapple so they hold their shape. If you can leave them overnight but mine held well after two hours.  

Weekly Tip: Test your oven’s thermostat every few months. Oven thermometers are inexpensive and you’ll be amazed at how far out temperatures can be. I had a friend whose oven was 40°C out! Even though it was set to 180°C it was actually 220°C. Test for hot spots too.